Does a herniated disc even allow exercises like deadlifts, squats and other sports? In this article you will learn how to overcome the current situation and regain your flexibility and resilience.
I’m with you, spinal disc damage is crap. But you can overcome it.
Ex-boxing champion Vitali Klitschko suffered two herniated discs. Then he became world champion.
In this article you will find out how to get back to safe training in five steps after a slipped disc.
Just like Vitali Klitschko.
The good news is:
Safe and correct strength training is also possible with a damaged spinal disc.
To get there, you first want to overcome the pain. Then you can get your body used to the strain again step by step.
I still remember one of my clients very well: around 50, so in their prime. He brought motivation as well as a damaged spinal disc. Nevertheless, within three months he got the shape of his life: “Mark, I wasn’t that fit even at 25.”
My thesis is:
A herniated disc is no reason not to look good naked.
And he is no reason to ignore his targets.
Maybe you can take a little more time. But if time had been a reason not to try, then the goal was probably not the right one for you anyway.
In this article you will learn a proven 5-step plan to overcome pain, build strength and find your way back to full resilience.
What are intervertebral disks and what do you need them for?
Your spine consists of a total of 24 vertebrae, each with 23 Intervertebral discs are movably connected to each other.
The intervertebral discs sit like cushions between the vertebrae and essentially take on the following tasks:
Intervertebral discs absorb impacts that occur in the direction of your spine.
For example when running or jumping, but also when doing exercises such as squats or deadlifts.
They also stabilize the movement of the vertebral arch joints.
The individual vertebrae are directly connected to one another via the vertebral arch joints.
The vertebrae are numbered from top to bottom and each assigned to one of the following areas:
- Cervical spine (cervical spine): seven cervical vertebrae, C1-C7 1
- Thoracic spine (thoracic spine): twelve thoracic vertebrae, Th1-Th12 2
- Lumbar spine (lumbar spine): five lumbar vertebrae, L1-L5 3
At the lower end of the spine there is also the sacrum (S1 ) and the tailbone (S2).
Unfortunately, the fibrous ring of an intervertebral disc can tear under continuous incorrect loading.
What is a herniated disc?
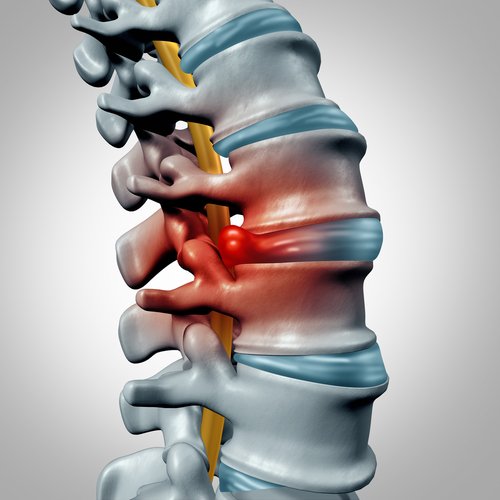
A herniated disc is one of the most common back injuries. The medical term is “intervertebral disc prolapse”.
It usually occurs in the lumbar spine area between the L3-L4, L4-L5 or L5-S1 vertebrae.
In the case of a herniated disc, the disc loses its original shape and protrudes outwards.
The ring of cartilage of the intervertebral disc tears partially or completely and is squeezed into the spinal canal in which the spinal cord runs.
If nerves are pinched in the process, it usually leads to severe pain.
The pain often occurs not only in the back, but can also radiate into other parts of the body such as the legs, which are supplied by the nerve.
Often a herniated disc does not trigger any symptoms and goes unnoticed.
That is, if the nerves are spared from the incident.
Slipped disc causes: How does a disc damage develop?
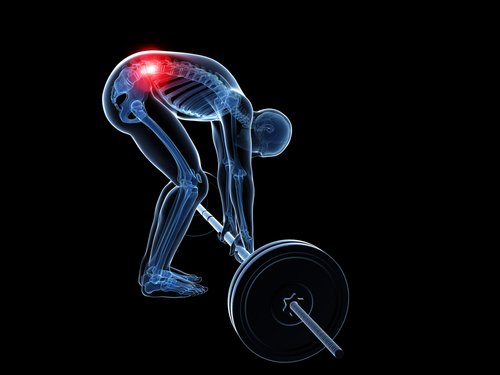
If a disc becomes abnormal changes, then this development usually happens over a long period of time.
Despite this chronic change, a prolapse usually only becomes noticeable at the last moment:
The symptoms of a herniated disc usually appear acutely and suddenly.
But the last movement is not the main cause of the prolapse. It is just the last drop to overflow.
The tricky thing is:
An unfavorable movement mechanism rarely causes pain.
But if you put wrong strain on your back again and again, you will collect microtraumas in your spine, which can add up to serious injuries.
This is why proper technique is so essential in strength training.
Just like an ergonomic workplace and a regular change of sitting or standing position. 5 And that is why homogeneously trained muscles are important because they relieve the intervertebral discs.
So we can think of it this way:
- If you put wrong strain on your back again and again, you take on a little more credit with every unfavorable strain.
- The sum of all these improper strains is the real cause of chronic disc disease.
- The severe pain that can occur suddenly with a herniated disc is nothing more and nothing less than the final bankruptcy declaration.
A high mobility of the lumbar spine is associated with herniated discs.
In other words:
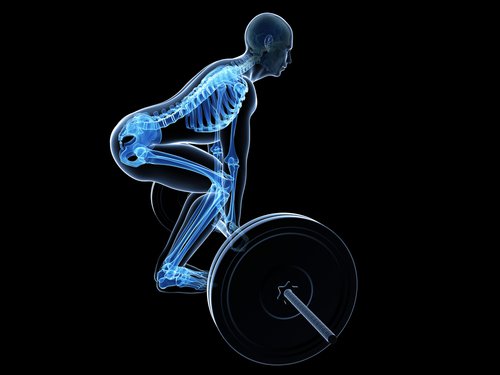
The more your spine leaves its neutral position under load, the greater the risk of pathological changes in the intervertebral discs.
You should therefore keep your spine neutral during training, especially when you are putting pressure on it.
Slipped disc symptoms: How do you recognize a prolapse?

A herniated disc can cause different symptoms. Here are a few general indicators:
Pain or numbness in the back, buttocks, thighs, and calves can indicate a herniated disc.
If nerves are pinched off by the prolapse, this can also lead to tingling or loss of strength in the part of the body that is supplied by the nerves.
If you suddenly lack strength that you cannot explain to yourself (e.g. due to exhaustion from yesterday’s training), you should consult a doctor.
If problems arise, you should consult a doctor as soon as possible.
A specialist can also use the symptoms to assess which region of the spine is most likely affected.
He should also perform the following tests to provide an accurate diagnosis:
- A complete neurological exam: This also includes the targeted examination of individual muscles, reflexes and feelings.
- A nerve test under tension: This usually includes lifting the straight legs or the crossed straight legs.
If none of this leads to a definite diagnosis, then imaging tests such as an MRI should also be performed.
An MRI can help, but is often associated with waiting times of several weeks. An MRI is not always necessary to diagnose and treat a herniated disc.
Slipped disc exercises: A safe 5-step plan back to proper strength training
I was able to accompany some herniated discs in my close circle of friends.
I know how hard it is not only to be able to cope with pain and restrictions in everyday life, but also to have to forego training.
The good news is:
The best long-term treatment for a herniated disc are: exercise and strength training!
Strength training is more than just sensible.
Strength training is an MANDATORY requirement for recovery after a herniated disc.
This is the only way to retrain your back muscles so that they adapt to the changed situation. 8
Exercises that help stabilize the spinal column segments are then most effective. 9
Which herniated disc exercises are useful depends on the situation:
- How are you feeling at the moment?
- How long has the herniated disc occurred?
Here is a 5-step concept that will help you find your way back to proper strength training after a herniated disc and to get back on track in a safe way.
Before you start training …
Carry out your training program always in consultation with your orthopedic surgeon or physiotherapist. You should only carry out therapy on your own if you have your doctor’s approval.
1. Level: Pain control and minimization
Before you can start doing strength exercises, you first want to minimize the pain.
In many cases, careful stretching of the back helps to shift the backward-shifted intervertebral discs forward again.
The symptoms usually improve if you carefully straighten the spine.
To do this, you should do one or both of the following exercises for stretching the spine once an hour (about 10 times a day) with 10 repetitions each.
Usually, after a week of consistent practice, you will feel better. In any case, you should also seek the help of a doctor or physiotherapist.
Disc herniation exercises # 1 – stretching the spine in the prone position
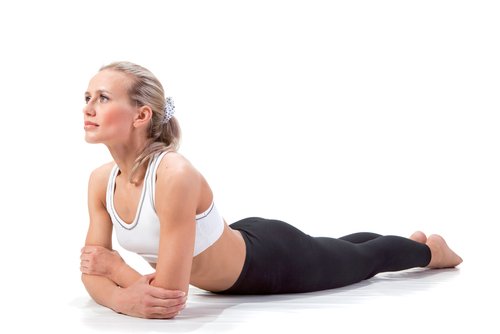
Tools : None. (Optional: reading wedge)
- Lie on your stomach.
- Consciously relax your back muscles.
- Try to support your upper body on your elbows. The yogis among us know this as the “Sphinx” pose.
- It is important that you stay relaxed while doing this. Concentrate on breathing normally.
- If you feel good in this position, you can try to stretch your arms and thus your spine further. Even now, your back remains relaxed while you push your arms through.
Tip: Use a reading wedge as soon as the symptoms get better. Then you can take this back-relieving position temporarily to read, watch series or work on the laptop.
Disc herniation exercises # 2 – Stretching the spine in the supine position
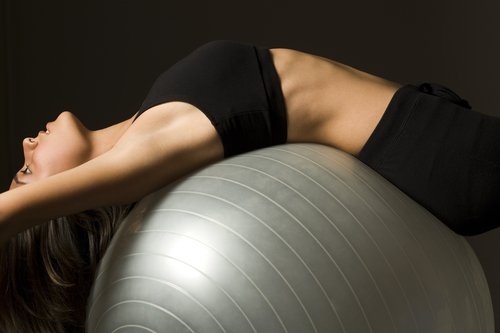
Aids : Exercise ball.
- Sit on the exercise ball.
- Now slowly step forward with your legs until your back rests on the exercise ball.
- Roll yourself back so far that your Lumbar spine touches the top of the ball.
- Now you slowly lower your head.
- Hold the position for a few seconds and then slowly straighten up again.
- Pause briefly and do the exercise a few more times.
Note: You can do this exercise as an alternative to stretching in the prone position. Some people feel better with this variant.
Further recommendations for pain control
This first stage is about getting the pain under your control. Now, careful exercise is the best medicine because it helps blood circulation and relieves pain.
Returning to light activity can actually accelerate the healing process that begins.
Always pay attention to the feedback from your body. Because one of the biggest mistakes you can make at this point is wanting too much too quickly.
Heavy loads slow your progress!
Because in this phase they lower the supply of nutrients to your spine. Presumably they also hinder the body’s own production of proteglycans, which are crucial for the function of your intervertebral discs.
It’s best to start with walks or walks. And pay attention to the feedback from your body before you turn to the strength exercises in the next levels.
In most cases, pain can be controlled within 14 days. Then you should be able to walk symptom-free, sit briefly or turn over in bed.
2. Level: coordination training and light load on the spine
Now you can start to put some strain on yourself again. The following is important:
None of the following three exercises should provoke further pain!
At this level you focus on the following goals:
- You start to put some strain on your spine again.
- You learn to move correctly again.
Because pain reduces your proprioceptive abilities. Proprioception is the ability to perceive the position and movement of your body in space. That means:
Pain reduces body awareness and control.
The following slipped disc exercises will help you regain both.
Your spine always remains in its neutral position during all exercises.
You learn to move correctly again and improve the stability of your torso.
Slipped Disc Exercise # 3 – Dead Bug Crunch
Tools : None.
Starting position :
- Lie on your back.
- Put your torso under tension so that your back maintains its neutral position.
- To get a better feeling for this neutral position you can fold a small towel under your lumbar spine. In this way you can feel whether your back remains neutral during the exercise.
- Lift your legs as if you wanted to sit down. Your torso keeps its position absolutely stable, as if it were cast in stone.
- Extend your arms and hands vertically towards the ceiling.
Execution:
- Pay particular attention to stability in your lower back. He doesn’t move a bit away from the towel.
- You feel your abdominal muscles are under tension to keep your pelvis stable.
- Perform the entire movement shown in the video by You bring one arm over your head parallel to the floor and stretch the opposite leg.
- Hold the end position for 5 seconds.
- Move your arm and leg back to the starting position in a controlled manner >
- Change sides.
Train daily until you can perform the exercise with clean technique for 2 minutes at a time.
Disc herniation exercises # 4 – arm support with arm and leg raises (Bird Dog)
The Bird Dog is almost identical to the Dead Bug Crunch in terms of its movement pattern. With the difference that you now overcome the gravity in the other direction.
This exercise trains your balance and stimulates the deep-lying muscles that stabilize the spinal column segments (multifidi and rotators). Strengthening these muscles is an imperative for healing after a disc injury.
Tools : None.
Starting position:
- Your hands are under your shoulders, your knees under your hips.
- Head, neck and back remain neutral.
Execution :
- Raise your right arm and stretch it forward until it forms a line with your torso.
- As you stretch your arm forward, you step back with your left leg, until it forms a straight line with your torso.
- Hold this end position for 5 seconds .
- Your spine should be motionless and in its neutral position throughout the exercise keep stable.
- Move your arm and leg back to the starting position and repeat the movement with the opposite arm and leg.
Exercise daily until you get the Perform the exercise with clean technique for 2 minutes at a time.
Tip: This is how you make sure that you do the exercise properly. At the beginning of the exercise, lay a Blackroll (or a rolled-up towel) on your back. As long as you keep it in balance over your spine, your back is stable.
Disc herniation exercises # 5 – hip flexions
Tools : broomstick.
Getting back into proper strength training after a herniated disc requires that you can bend your hips without any movement in your lumbar spine.
This exercise gives you a feeling for the correct posture of your back, which you need for safe training of the basic exercises (e.g. squats, deadlifts, bent barbell rows).
Execution:
- Position the broomstick so that it touches the back of your head, upper back and tailbone.
- Stand up straight. Your lumbar spine should now be slightly curved forwards (“lordosis”).
- Keep this natural curve while you bend your hips forward in a controlled manner by keeping your body in contact with all three points of contact. (If the contact breaks at one of the three points, your back has left its neutral position.)
- Extend your hips in a controlled manner and bring your body back into the upright position.
- Repeat the movement until you feel safe in it.
Tip: If you still feel insecure with the standing hip flexion, you can also initially perform the movement pattern in the four-footed position (Video).
By practicing this hip flexion exercise, you internalize the following principle:
With proper strength training you always lift weights from your hips and never from your back.
The intuitive understanding of how to stay flexible in your hips while keeping your spine stable is a mandatory requirement for safe squats, deadlifts and rows.
3. Stage: healing and stabilization of the spine and trunk
For this phase you will need about 2 to 4 weeks. The focus is on controlled movements to stabilize your spine.
Now you are also ready for more demanding exercises that exert rotational forces on your spine and which you have to work against.
At this point in time, your body is fully in the process of healing and recovery.
The focus of training is on the deep-lying stabilization muscles of the vertebral segments and the trunk (multifidi, rotators, inner and outer oblique and transverse abdominal muscles).
From this level you also start to work with additional weight.
Disc herniation exercises # 6 – Lateral forearm support (plank)
The side forearm support is a great exercise that strengthens your oblique abdominal muscles without subjecting your spine to excessive compression forces.
Start the side plank in its simpler version with the knees down. As soon as you have mastered this variant, you can do the exercise with your legs straight.
Tools : None.
Execution:
- Lie on your side.
- Position your feet on top of each other and your forearm below your shoulder.
- Tense your torso as much as possible and lift your hips off the floor, like this that your body forms a straight line from head to toe.
- Hold the side forearm support for 10 seconds.
- 3 seconds break.
- Perform a total of 10 repetitions.
- Repeat the exercise with the other side.
Combine the repetitions step by step as you feel yourself getting stronger until you can hold the side forearm support for 100 seconds at a time.
Disc herniation exercises # 7 – Pallof press
With the Pallof press you strengthen the rotational stability of your spine. The exercise also trains the entire core including the abdominal muscles and your shoulder girdle.
The Pallof press is not only an effective rehabilitation exercise, but also an excellent core and abdominal muscle exercise in regular strength training that can make you sweat properly.
Aids : Resistance band or cable pull.
Execution:
- Position a cable pull or resistance band at the side at about the level of your elbows.
- Hold the handle or the end of the resistance band at the level of your stomach.
- Tense your body to the maximum .
- Extend your arms forward perpendicular to your body. You feel how the force tries to pull you to the side.
- With your body tension you resist the force and maintain an absolutely symmetrical, upright posture.
- Hold the end position for 5 seconds.
- Slowly move your hands back towards your stomach.
- Perform 10 repetitions.
Increase the level of difficulty as soon as you find the exercise easy. With the cable pull you simply choose a higher weight. If you use a resistance band, you increase the distance to the anchor point.
Tip: You can vary the height of the anchor point in order to put the focus of the training more on the abdominal or back muscles. If you move the anchor point to shoulder height, your abdominal muscles have to work harder. In order to challenge your back more, you lock it below your pelvis.
Slipped Disc Exercise # 8 – Unilateral Rowing & Pushing
The second half of the herniated disc exercises in level 3 consists of the pulling and pushing exercises that you already know from Looking Good Naked.
With the following difference:
You train the pulling and pushing exercises unilaterally, i.e. one-sided.
That means, if your regular training plan includes bench presses with the dumbbell, then you do it now on one side: first with the right, then with the left. The same principle applies to pulling exercises.
The single arm versions require lighter weights.
It is best to start with the two exercises shown above. You will feel how they challenge your core and the stabilizing muscles of your back in a completely different way than you are used to from the exercises on both sides.
Aids : Everything that creates resistance (dumbbells, resistance bands, cable pull, kettlebell, …).
4. Level: Rotation training and strength building
Your pain is history? Congratulation! You are now ready for the fourth level.
You have spent the past few weeks strengthening your core so that it can withstand rotation and flexion under load.
In this stage you build up further strength so that your spine can rotate safely.
This means that you learn to rotate your torso safely under load without bending or stretching it.
You are almost there.
Because this level makes you fit for a return to proper strength training.
Disc herniation exercises # 9 – trunk rotations
Tools : Cable pull or resistance band.
Now you start to rotate your upper body while still controlling your core.
In the first step, you perform the rotation exclusively via the spine. When you feel safe with it, you start rotating your hips as well.
Via the height of the anchor point you can reach different muscle groups – similar to the Pallof press.
Make sure that you keep your spine upright, so that you neither bend nor stretch it.
5. Level: Proper strength training
As soon as you can rotate your spine safely and painlessly under load, you are ready for a return to proper strength training.
Now you can orient yourself to the 7 principles of correct strength training in order to find your way back to the old form – and to grow beyond it.
The following is also important here:
Probably the biggest mistake you can make now is wanting too much too quickly.
Be patient with yourself. Even if you have previously trained according to advanced training plans, you should start slowly. Use lighter weights, higher repetitions, pay particular attention to the correct technique and increase progressively.
You can use the onboarding training plans in Looking Good Naked as a guide. From there you continue to climb as described in the book.
It is a good idea to keep trunk exercises such as the Pallof press or the rotation exercises from level 4 as an integral part of your training program.
Book tip: Further recommendations and herniated disc exercises
My aim with this article is to give you a compact overview of the causes and symptoms of a herniated disc. I would also like to encourage you that a herniated disc – as bad as it may seem at first – is always an opportunity that can make you stronger and more injury-resistant in the long term.
You now know what a path can look like that leads you back to proper strength training and full resilience.
You can probably also imagine that a single article cannot possibly do justice to the complexity of a topic that fills entire textbooks.
Prof. Dr. Michael Weller and Doris Brötz have published a book with the title “Intervertebral Disc Active Program”, which in many cases goes into more detail, conveys important basic knowledge and gives you additional herniated disc exercises that you can do without additional aids.
If a slipped disc or back pain had been an issue for you, I recommend that you invest the almost 20 euros in this book and take the time to read it.
If you combine both – book and article – with the recommendations of your therapist, you are well on the way to picking up speed again in record time. Towards your naked-looking-good goal.
Conclusion
Ex-boxing champion Vitali Klitschko suffered two herniated discs. Then he became world champion.
Training after a spinal disc disease is always an opportunity and for many people the initial spark for a healthy lifestyle that they stick to for a lifetime despite the mental and time-related workload of family and work. Often you are soon more flexible and resilient than you have been for years.
The fact is: a herniated disc is not a reason not to look good naked.
In this article you have learned why this is so, how a disc damage occurs and how you can get back to proper strength training with suitable herniated disc exercises in 5 steps.
You pick up speed again and get closer to your goal – like Vitali Klitschko the world championship title.

